Shopify Remix Discount App Tutorial (Part 2/3)
Learn how to create a discount App using the Shopify Remix App Framework
Intro
Welcome back! This is the second part of a series where we build a Shopify Discount App. If you didn't read part 1 you can read it here.
Before we start
Recap
In part one of this series you successfully created a Shopify Discount Function and added it to your store. To keep things simple and focus on the function itself, we hardcoded the discountMessage, discountProducts, discountValue, and discountType values into our Function.
It would be ok to keep it like this if you only needed one specific discount, but our goal is to create a user interface to allow merchants to create as many discounts as they want with different values.
Function Metafield and Function Owner
To pass dynamic values to your query and function you will need to use meta fields defined on a function owner.
With that knowledge in our hands, we can get stra to the implementation.
Development
Specifying Function Input Variable
The first thing you need to do is to Specify the meta field that your function will use. Open the extensions/customer-tag-discount/shopify.extension.toml file and paste this at the end of it:
  [extensions.input.variables]
  namespace = "$app:customer-tag-discount"
  key = "function-configuration"
This is how you tell your function which meta field defined on its function owner should it use. If you are familiar with Shopify meta fields it will look very familiar to you as we always have to specify namespace and key .
Setting up Discount Metafield
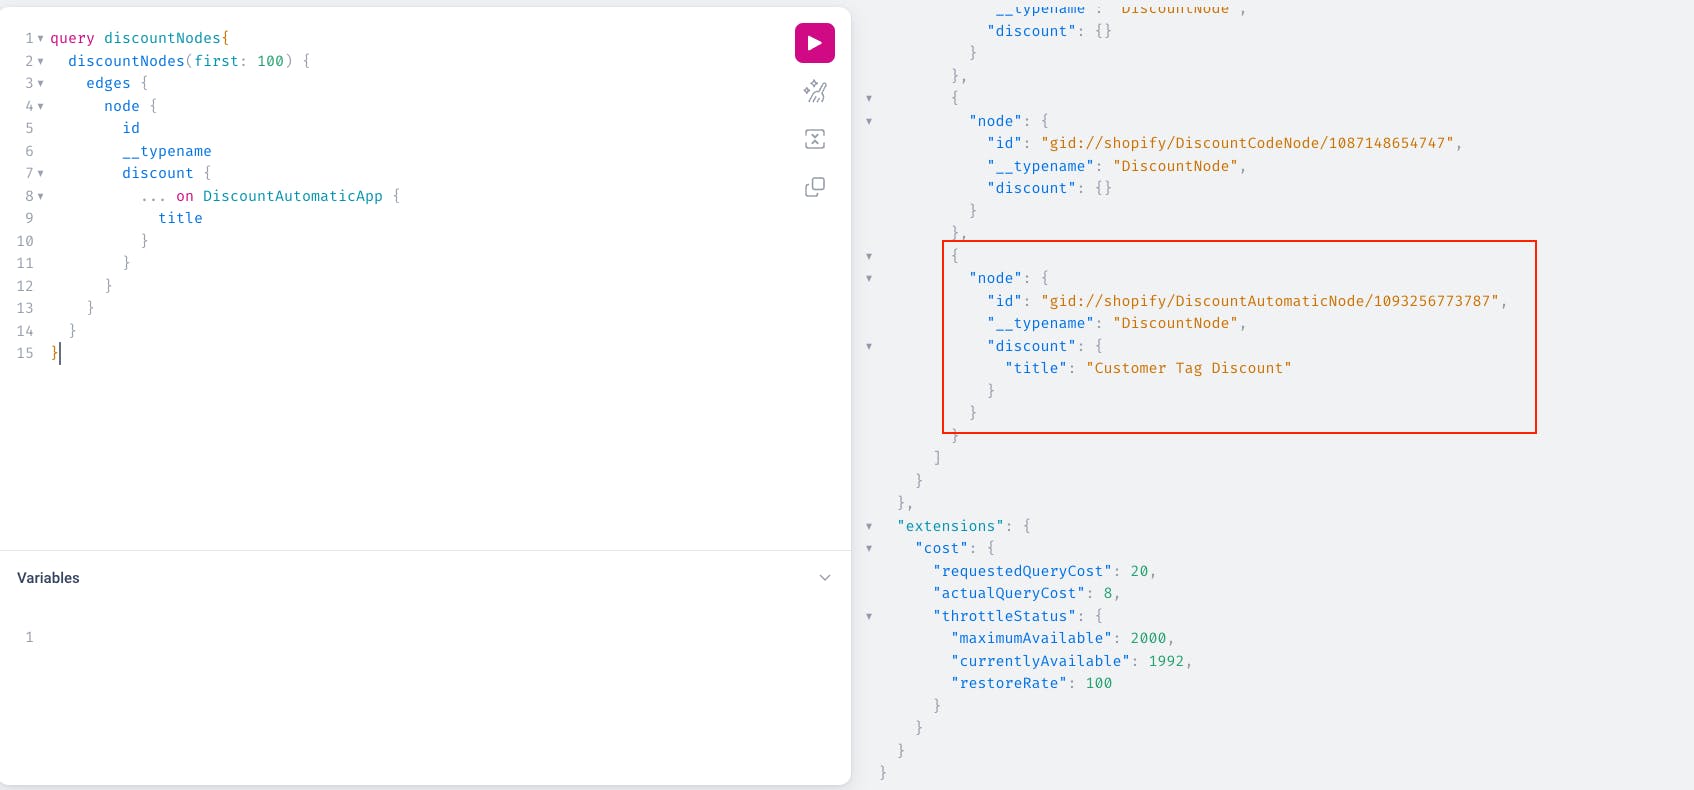
To set up the metafield you will use the metafieldsSet mutation, but first, you need to query discountNodes and retrieve your Discount ID.
discountId , that's the one we need!In the root of your project run npm run dev and press 'g' to open the GraphiQL tool. Create a new tab and paste this query in:
query discountNodes{
  discountNodes(first: 100) {
    edges {
      node {
        id
        __typename
        discount {
          ... on DiscountAutomaticApp {
            title
          }
        }
      }
    }
  }
}
This will query all the discounts that are currently in your store. Look for the one we created in part 1 of this series and copy it's id

Now that you have an ID of your discount you can create a meta field. Create a new tab in the GraphiQL tool, and paste this query:
mutation SetMetafields {
  metafieldsSet(metafields: [
    {
      namespace: "$app:customer-tag-discount",
      key: "function-configuration",
      ownerId: "[Paste you discount node ID here]",
      type: "json",
      value: "{\"discountType\":\"orderDiscount\",\"discountProducts\":[],\"discountValue\":20,\"discountMessage\":\"This discount is using dynamic metafield values!\",\"discountTags\":[\"VIP\",\"Loyal\"]}"
    }
  ]) {
    metafields {
      id
    }
  }
}
namespace and key has to match the one defined in extensions/customer-tag-discount/shopify.extension.toml.Now when you run this query and everything goes well it should return you a meta field ID:

Updating Function GraphQL query
It's time to update your function query. Replace code in the run.graphql file with:
query RunInput($discountTags: [String!]!) {
  cart {
    buyerIdentity {
      customer {
        hasAnyTag(tags: $discountTags)
      }
    }
    lines {
      merchandise {
        ... on ProductVariant {
          id
          product {
            id
          }
        }
        __typename
      }
    }
  }
  discountNode {
    metafield(
      namespace: "$app:customer-tag-discount"
      key: "function-configuration"
    ) {
      value
    }
  }
}
You should notice that now you also query the discountNode and meta field that you just set up on it. In addition, you can also use its values as your function input. Notice how the $discountTags input variable is the same as the key defined in your meta field JSON value.
Run npm run typegen to generate new types and validate your function (remember to navigate to your extension folder).

Updating Function Logic
Now that your function is also querying the meta field defined on it you need to update the Function logic.
Open run.js file and replace its content with:
import { DiscountApplicationStrategy } from "../generated/api";

const EMPTY_DISCOUNT = {
  discountApplicationStrategy: DiscountApplicationStrategy.First,
  discounts: [],
};

export function run(input) {
  if (!input?.cart?.buyerIdentity?.customer) {
    return EMPTY_DISCOUNT;
  }

  const customerTagFound = input.cart.buyerIdentity.customer.hasAnyTag;

  if (!customerTagFound) {
    return EMPTY_DISCOUNT;
  }

  //---

  // const discountType = "orderDiscount";
  // const discountProducts = [];
  // const discountValue = 10;
  // const discountMessage = "10% VIP or Loyal Customer Discount";

  // Get your parsed metafield object from function input
  const configuration = JSON.parse(
    input?.discountNode?.metafield?.value ?? "{}",
  );

  // Instead of using hardcoded values you will now use the ones passed in function input metafield
  const discountType = configuration.discountType;
  const discountProducts = configuration.discountProducts;
  const discountValue = configuration.discountValue;
  const discountMessage = configuration.discountMessage;

  console.log(discountType);
  console.log(discountProducts);
  console.log(discountValue);
  console.log(discountMessage);

  //---

  let targets = input.cart.lines
    .filter((line) => {
      return line.merchandise.__typename === "ProductVariant";
    })
    .map((line) => {
      return {
        productVariant: {
          id: line.merchandise.id,
        },
      };
    });

  if (discountType === "productsDiscount") {
    targets = targets.filter((target) => {
      return discountProducts.some((product) => {
        return product === target.productVariant.id;
      });
    });
  }

  if (targets == []) {
    return EMPTY_DISCOUNT;
  }

  const DISCOUNTED_ITEMS = {
    discountApplicationStrategy: DiscountApplicationStrategy.First,
    discounts: [
      {
        targets: targets,
        value: {
          percentage: {
            value: discountValue,
          },
        },
        message: discountMessage,
      },
    ],
  };

  return DISCOUNTED_ITEMS;
}
Test your Function
Let's start our dev server again, run npm run dev, open the store preview, and add some products to the cart.

Amazing, now your function uses a metafield to pass in variables like discount amount, discount Type, and discount message!
Function run logs
Open your partner Dashboard, navigate to Apps > customer-tags-discount-app > Extensions > customer-tag-discount, and open the latest function run to view its details.

This is where you can see console.logs that we added to the function logic, very useful when you need to debug your functions!
Outro
That's it for this part, I hope I will see you in the next one where we will build a UI so instead of creating discounts and populating its meta fields via GraphiQL tool you will be able to do it in the Admin Discounts page!
See ya!
